How to Enhance WordPress Admin with ACF Columns
Advanced Custom Fields (ACF) excels at adding structured data to WordPress, but viewing this information at a glance becomes challenging. Once you’ve created these powerful custom fields, seeing their content without opening each post or user is what’s missing. Fortunately, there’s an excellent solution that lets you view all your custom field data from a single screen, making content management significantly more efficient.
Wouldn’t it be great if you could see and edit all your custom field data without opening each post individually? Imagine saving hours by making updates from a single screen, transforming time-consuming tasks into quick, efficient workflows. This approach would help your productivity by eliminating the need to navigate through countless edit screens.
But there’s a better way to handle this. By implementing column layouts for your ACF fields and leveraging specialized tools like Admin Columns, you can transform your WordPress admin experience from chaotic to streamlined.
Today, you’ll learn how to organize your ACF fields into efficient column layouts, display them in list views, and implement powerful filtering, sorting, and editing capabilities – all without writing a single line of code.
Simplify your WordPress admin with Admin Columns
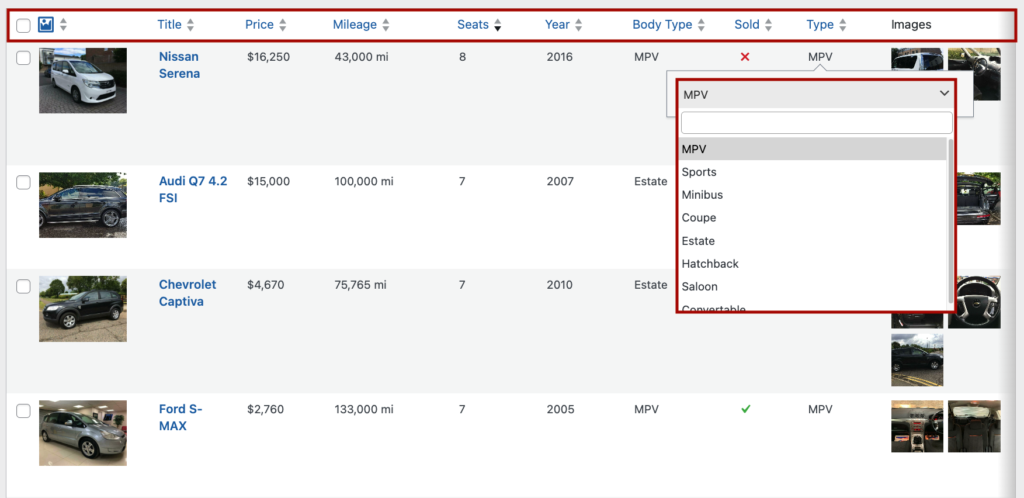
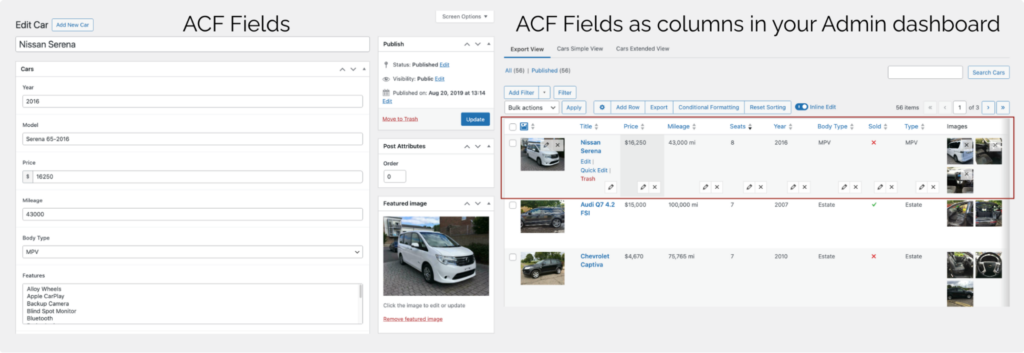
Managing content in ACF fields across dozens or hundreds of post types (pages, products, posts, or custom types) typically means clicking into each one by one – a process that eats up hours of your workday. Admin Columns changes that completely by bringing your custom field data directly to your list tables.
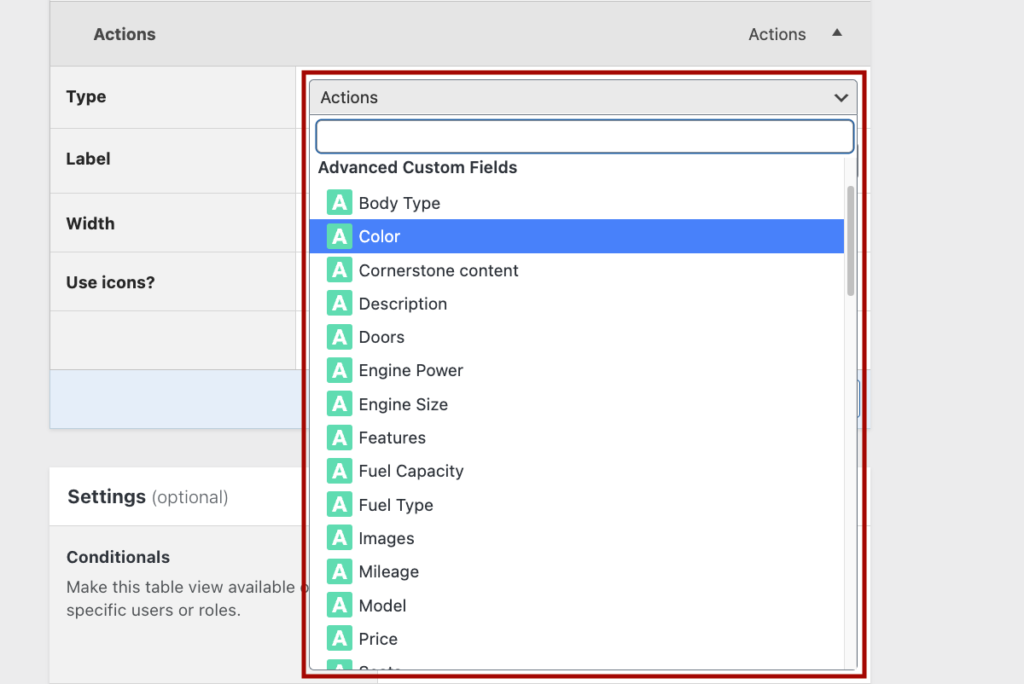
Admin Columns integrates perfectly with ACF without requiring any code. Once installed, you can immediately start adding custom field columns to your posts, pages, users, and other content types. This means all your important field data becomes visible at a glance.
The magic happens when you start using Admin Columns’ powerful integrated features:
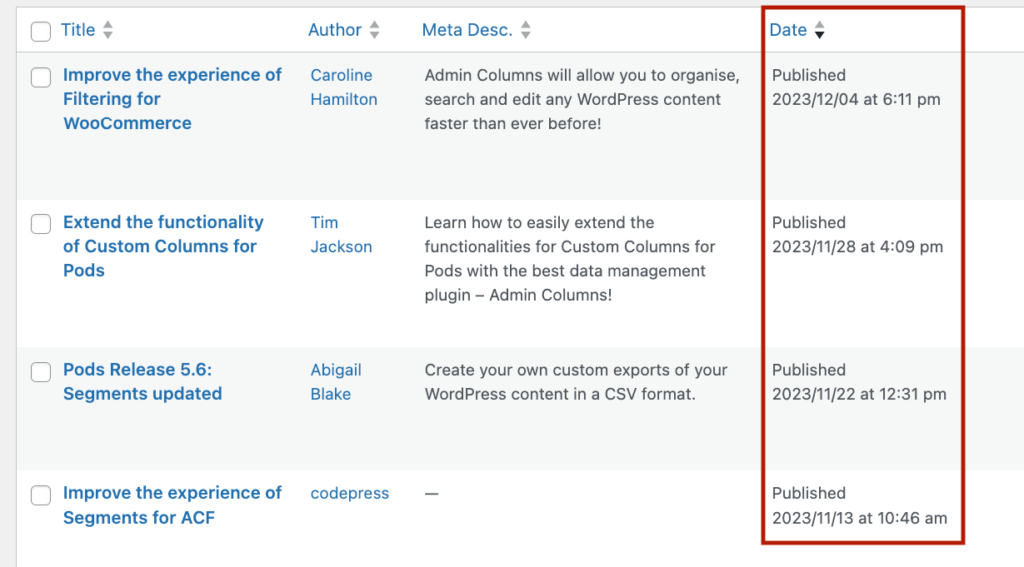
- View all your ACF field values in neatly organized, sortable columns.
- Edit field content directly from the list view – no need to open individual posts.
- Filter posts by any field value to quickly find what you need.
- Make bulk updates to multiple posts at once, saving massive amounts of time.
Admin Columns reads the ACF configuration and ensures viewing and updating happen in accordance with ACF field rules. Text, number, image, relationship, and date fields all display perfectly in your list tables, while complex fields like Flexible Content have limited support due to their nature.
This integration transforms how you manage content by putting everything you need on a single screen. Content editors can instantly spot missing information, incorrect values, or outdated content without hunting through individual edit screens.
“Admin Columns Pro is a super intuitive lifesaver! A few clicks later, we were filtering and editing content directly from the columns! Thanks for saving us from the dreaded hours of loading all those edit pages!”
Elliot Condon – Founder of Advanced Custom Fields
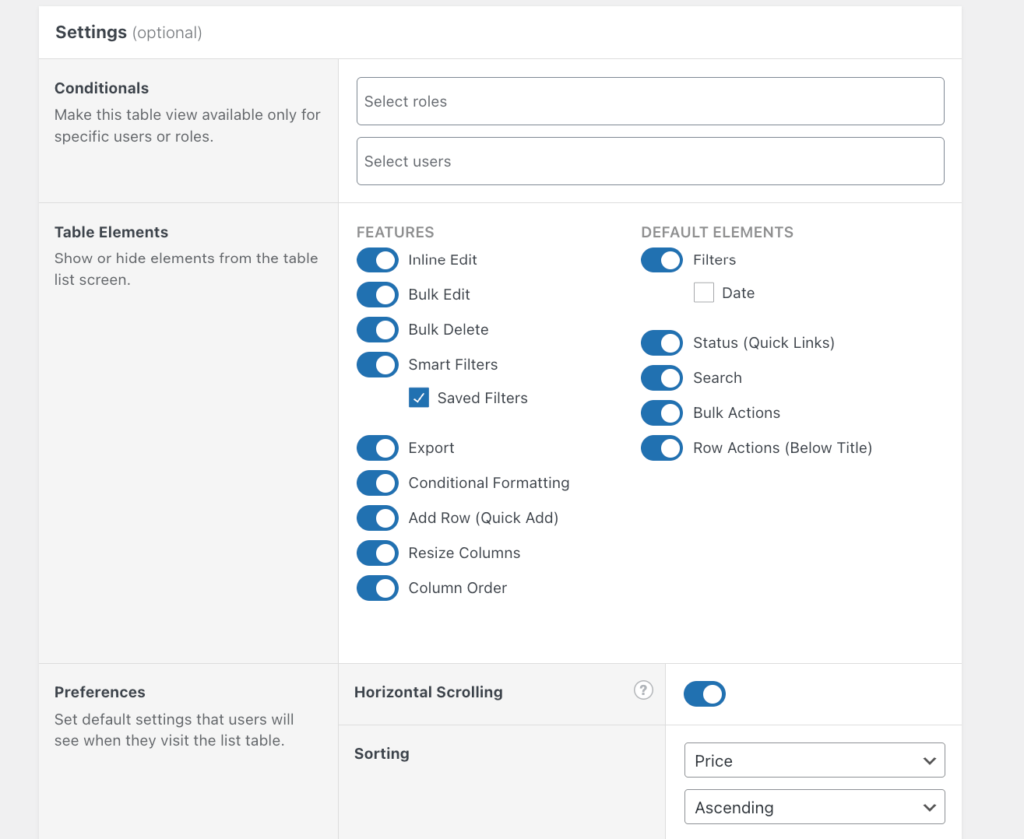
Filter, sort, and customize ACF fields without code
Default WordPress admin tables are pretty basic. They don’t let you filter by custom fields or sort through your content efficiently. This is where Admin Columns really shines by supercharging your ACF fields without requiring a single line of code.
Smart filtering that works
The built-in filtering in WordPress is… well, let’s just say it leaves a lot to be desired. Admin Columns gives you filtering options that actually make sense:
Filter by any ACF field type directly from your list tables – whether it’s text, images, relationships, or dates.
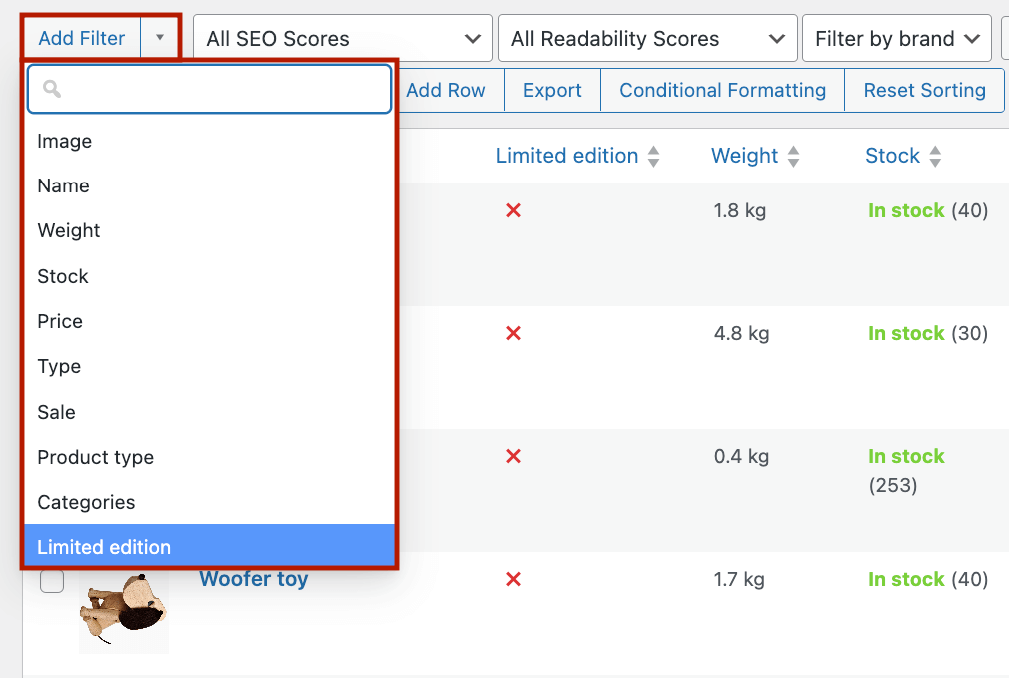
Create field-specific filters that understand your data – like date ranges for date fields or numeric comparisons for number fields.
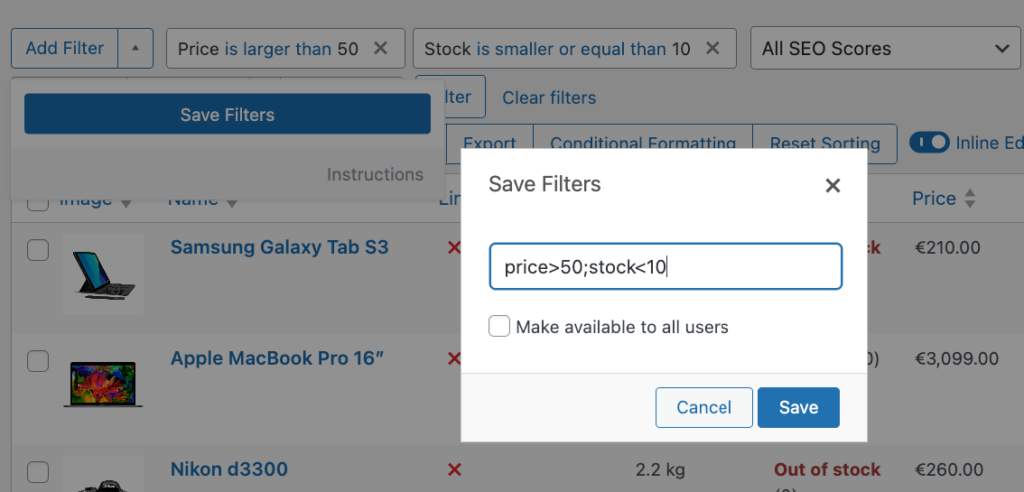
Combine multiple filters to narrow down your content (for example, “show me all products with price > $50 AND stock < 10”).
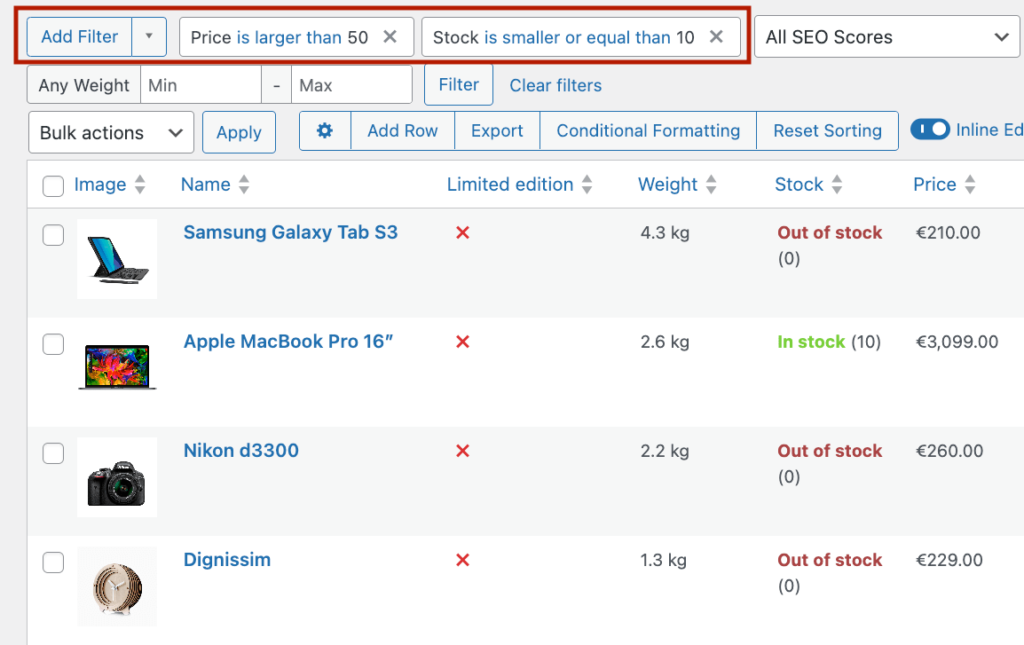
Save your favorite filter combinations so you don’t have to recreate them every time.
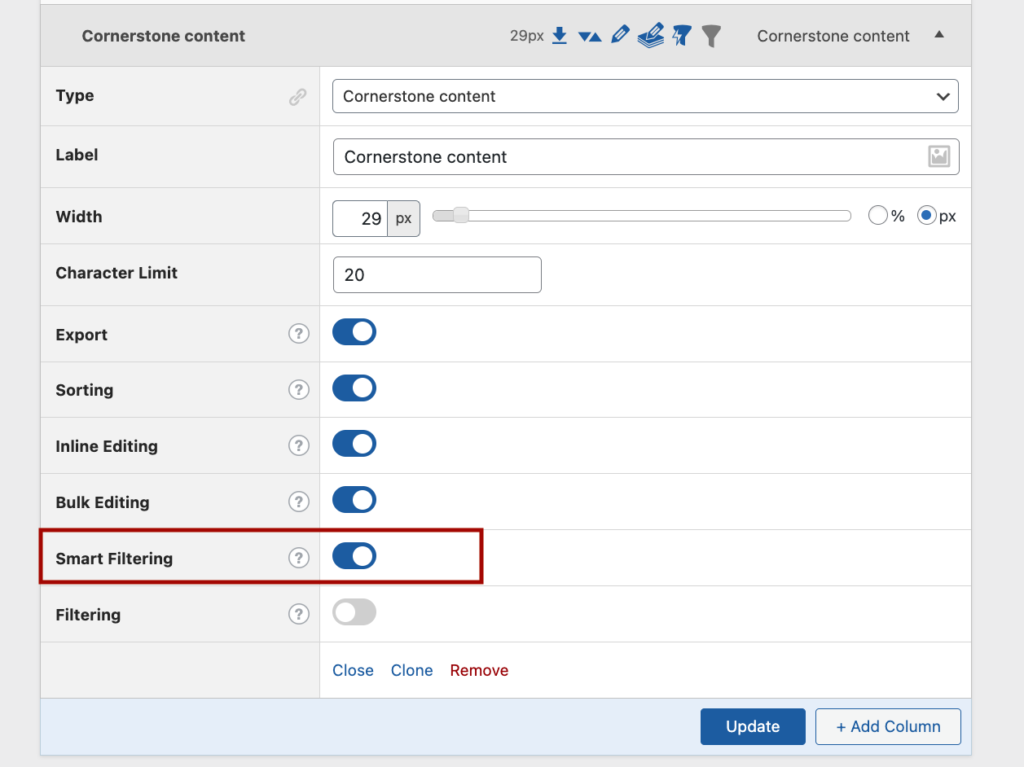
What’s great is that you can add these filters with just a few clicks. No need to fiddle with queries or hooks – just enable the Smart Filtering option when adding your ACF column.
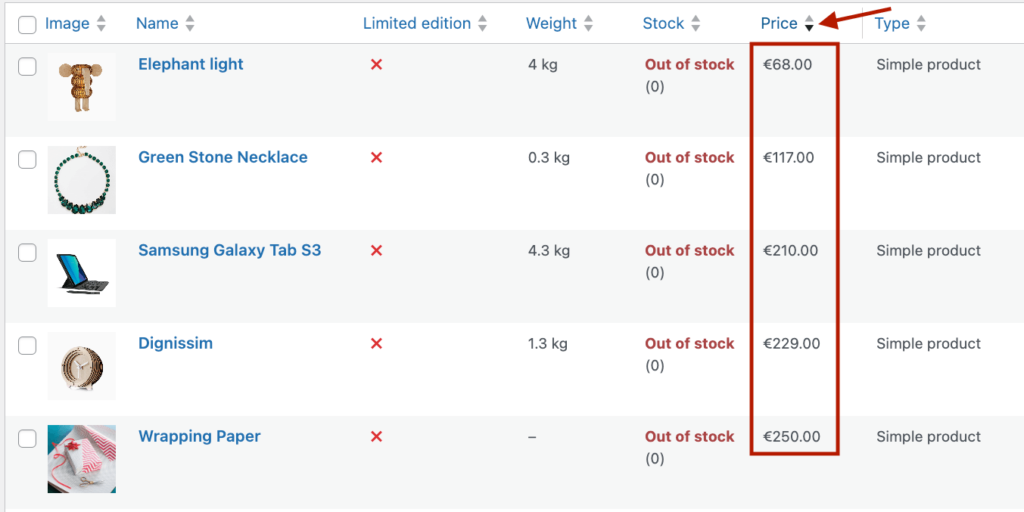
Sorting that understands your data
With Admin Columns Pro, you can sort by virtually any ACF field type:
Click column headers to instantly sort content in ascending or descending order.
Sort numeric fields properly (so 10 actually comes after 2, not before!)
Sort date fields chronologically instead of alphabetically.
Store your preferred sort settings per user so everyone on your team can have their own view.
The plugin is optimized for performance, so even sites with thousands of posts remain snappy when sorting through custom field data.
Column customization with visual feedback
Beyond just showing your ACF data, Admin Columns lets you:
Set exact column widths (goodbye tiny, squished columns!)
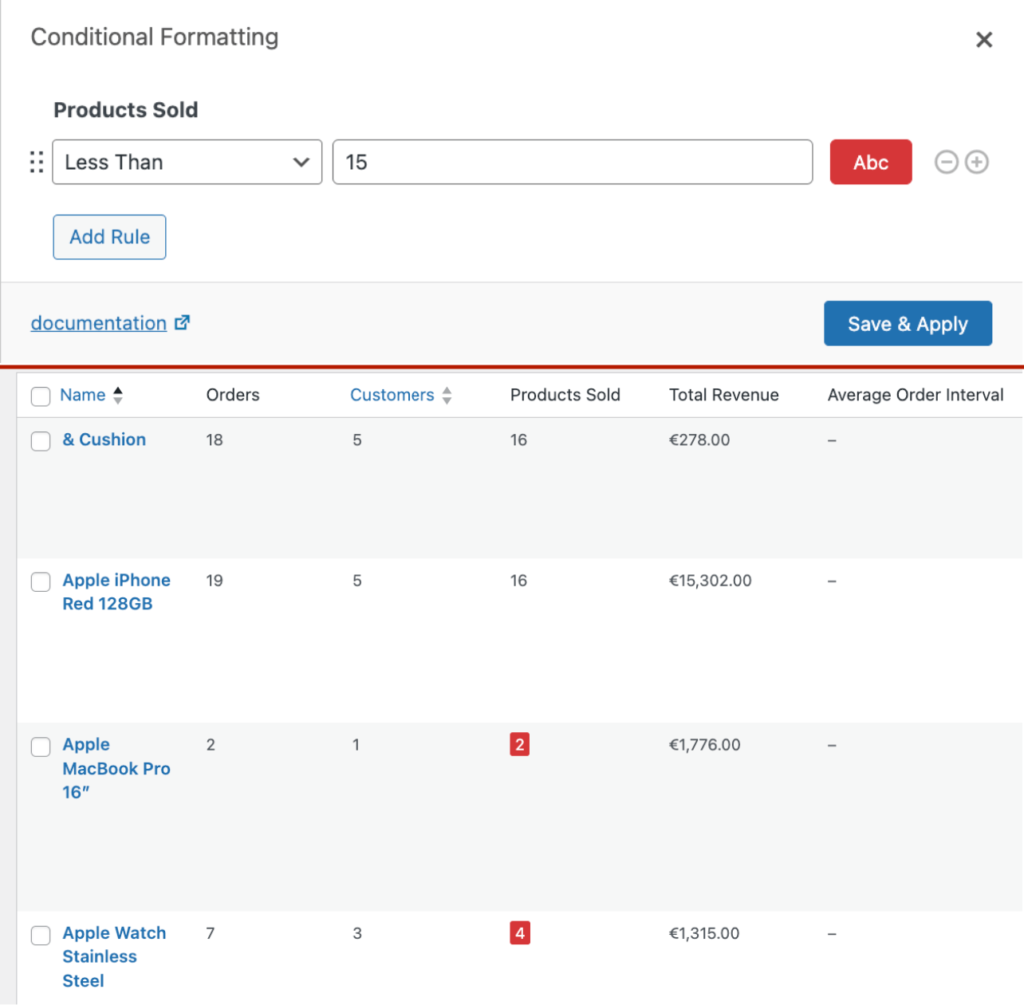
Apply color-coding based on field values – for instance, highlighting products with low sales in red.
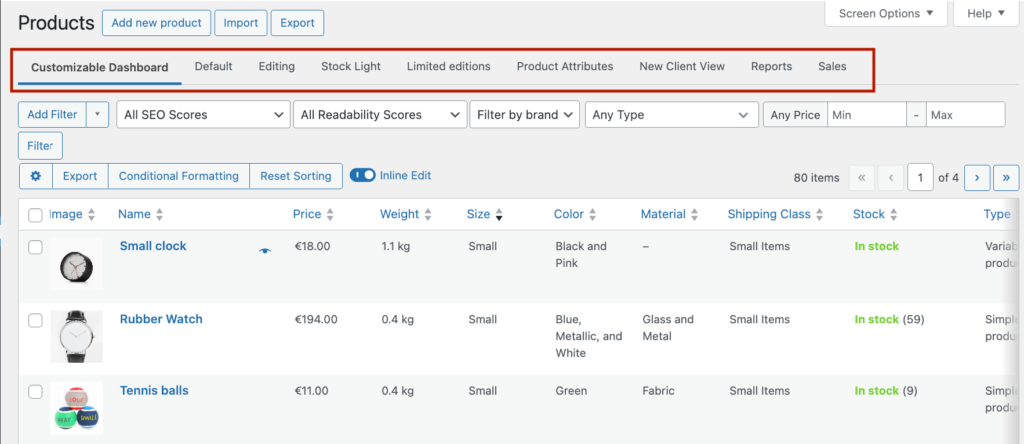
Create custom table views for different team members, showing only relevant columns for each role.
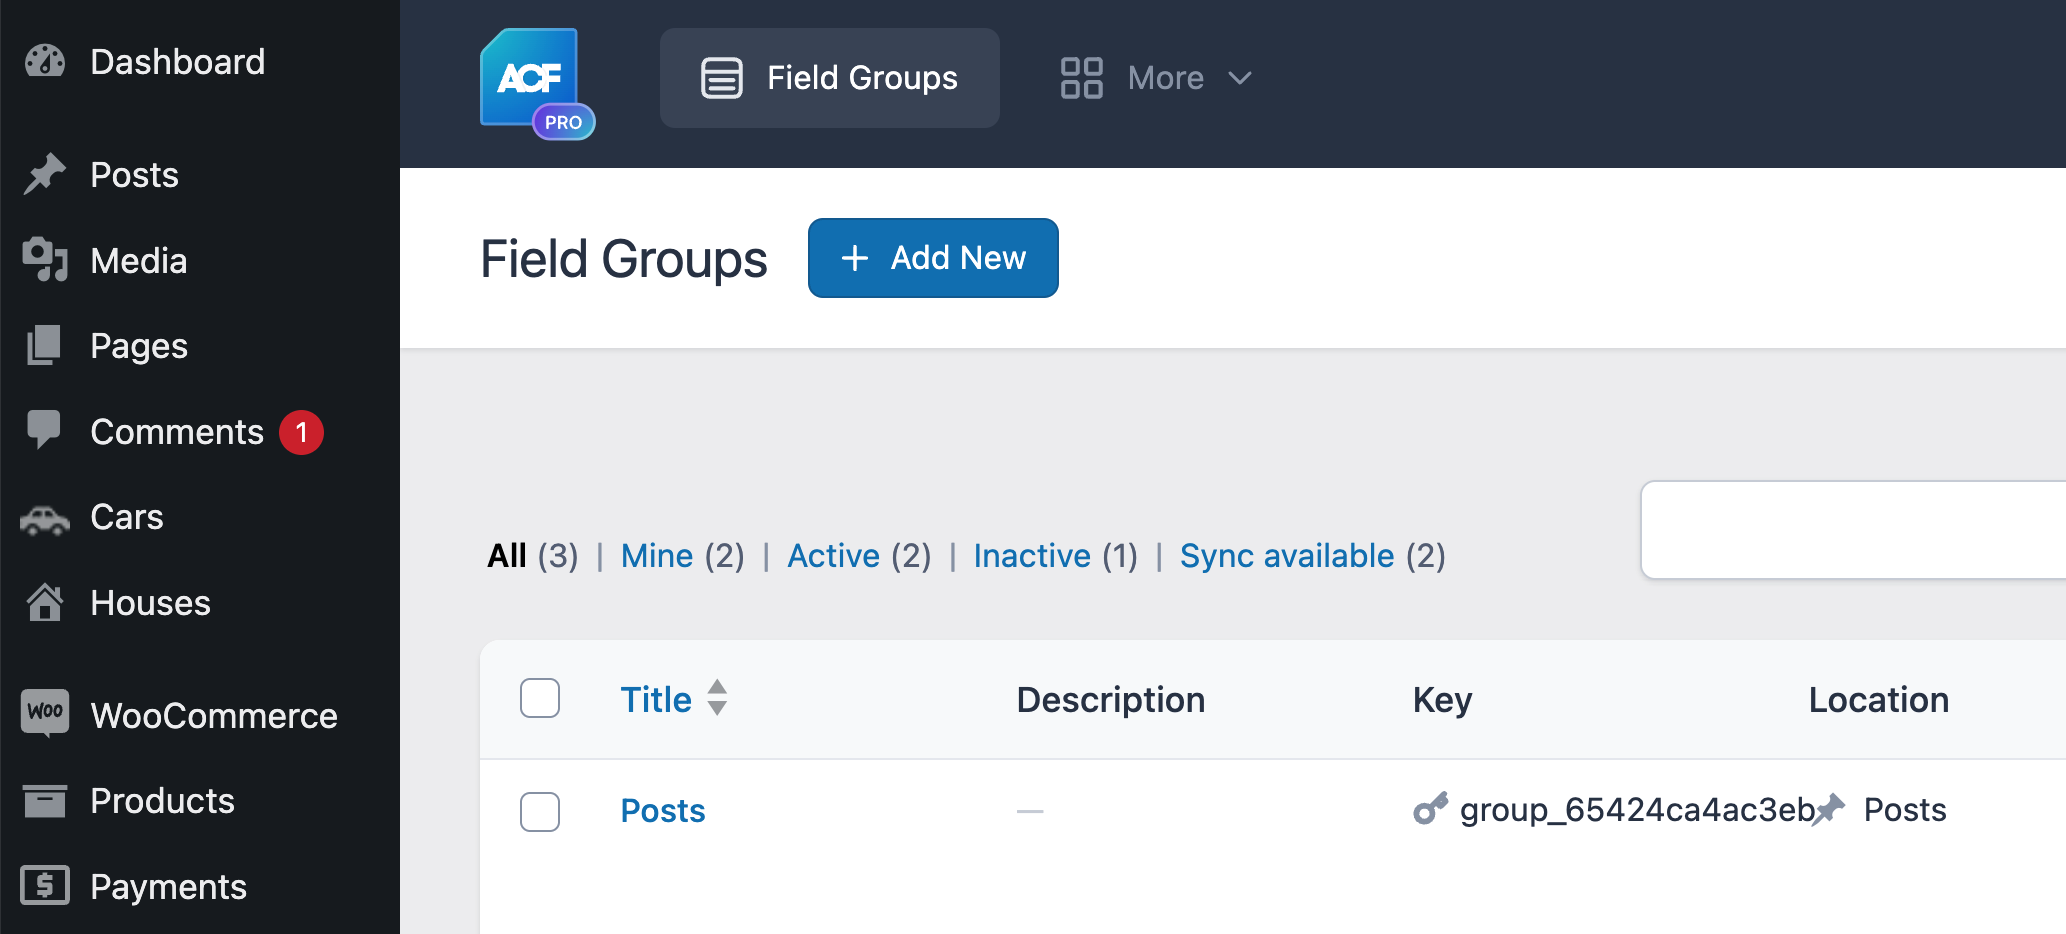
Getting started with Admin Columns and ACF
Setting up is straightforward:
Install Admin Columns and activate the ACF integration add-on.

Go to Admin Columns settings (under Settings in your dashboard) and select the content type you want to modify (posts, pages, users, etc.).

Add your ACF fields as columns and configure their display options.
Enable the additional features you want (sorting, filtering, inline editing).
Implementing ACF columns: A step-by-step guide
Now, if you need to have ACF columns within individual posts, pages, or custom post types, that’s a whole other setup. For example, you might want to have a custom field group that shows up in two rows to save space.

If you want to do this, first, ensure you’re running ACF PRO 5.4.0 or higher, as the earlier versions don’t support the field width feature. If you’re planning to use conditional logic across columns, ACF 5.7+ is recommended for the most reliable behavior.
Basic column setup
Create a new field group or edit an existing one.
Add a “Group” field type and give it a name.
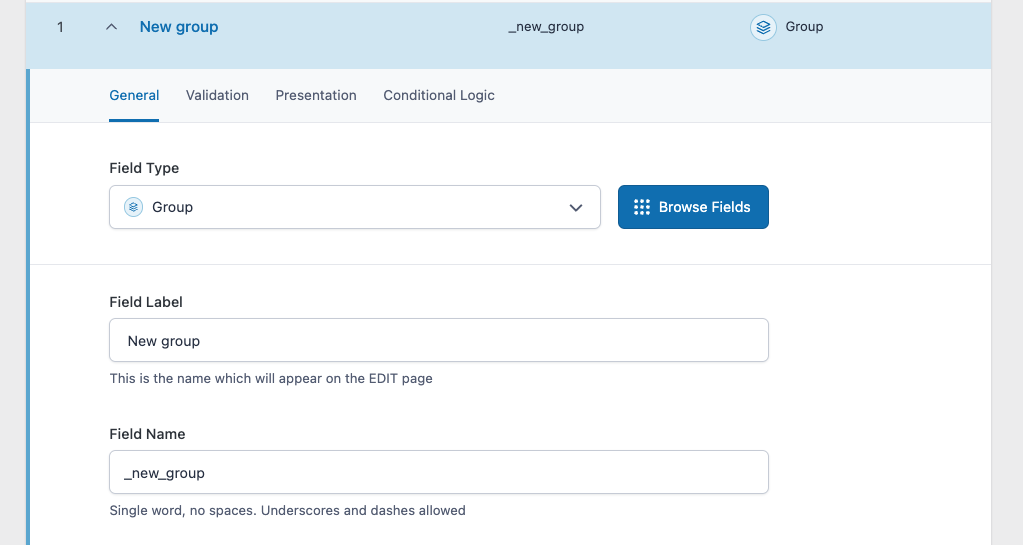
Add the sub-fields.

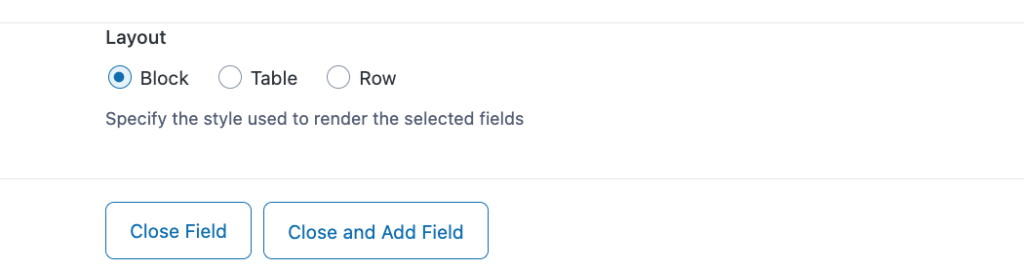
Choose the Block layout type.
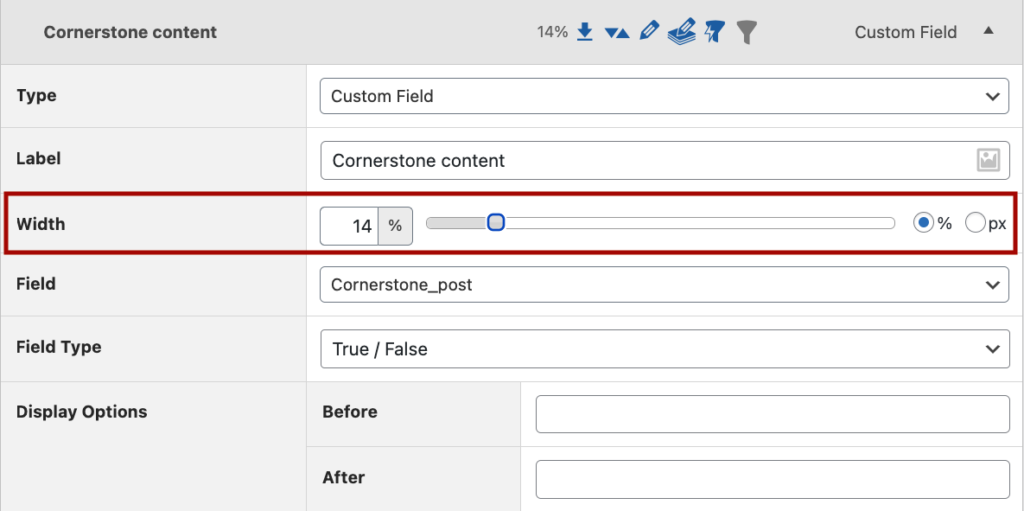
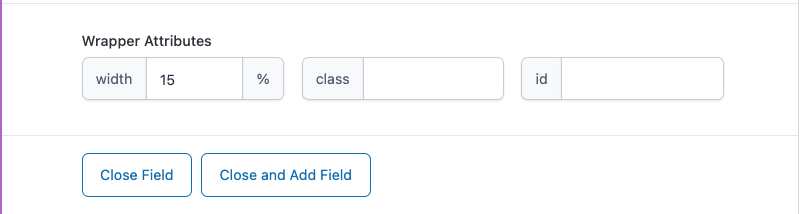
For each field, locate the “Width” setting for the Wrapper Attributes in the field presentation panel. Enter a percentage (50%, 33%, 25%, etc.) for how much horizontal space the field should occupy. Make sure that together they make up 100%.
Fields will flow horizontally until they reach 100%, then automatically wrap to the next row.
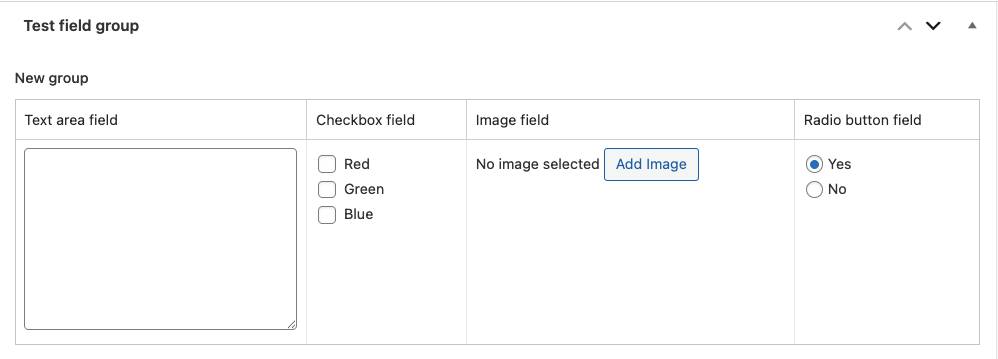
Here is how it looks without any adjustments:
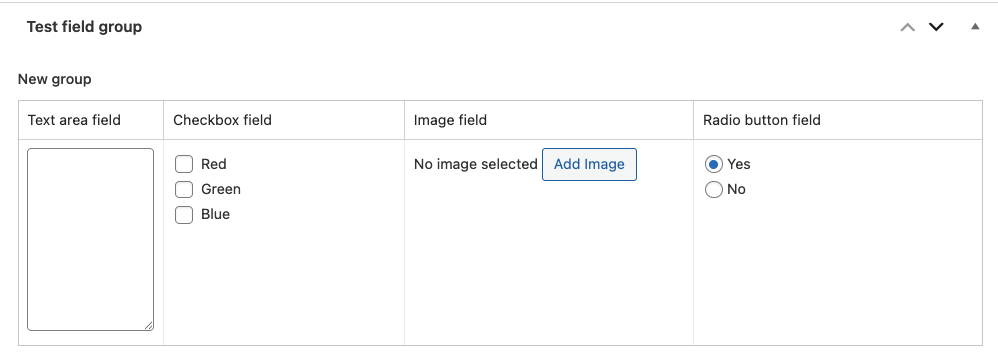
And this is how it looks after:
If you want to force a new row before reaching 100% width, just add a field with a width set to reach exactly 100% or insert a “Message” field with 100% width containing only a horizontal rule (<hr>) to create visual separation.

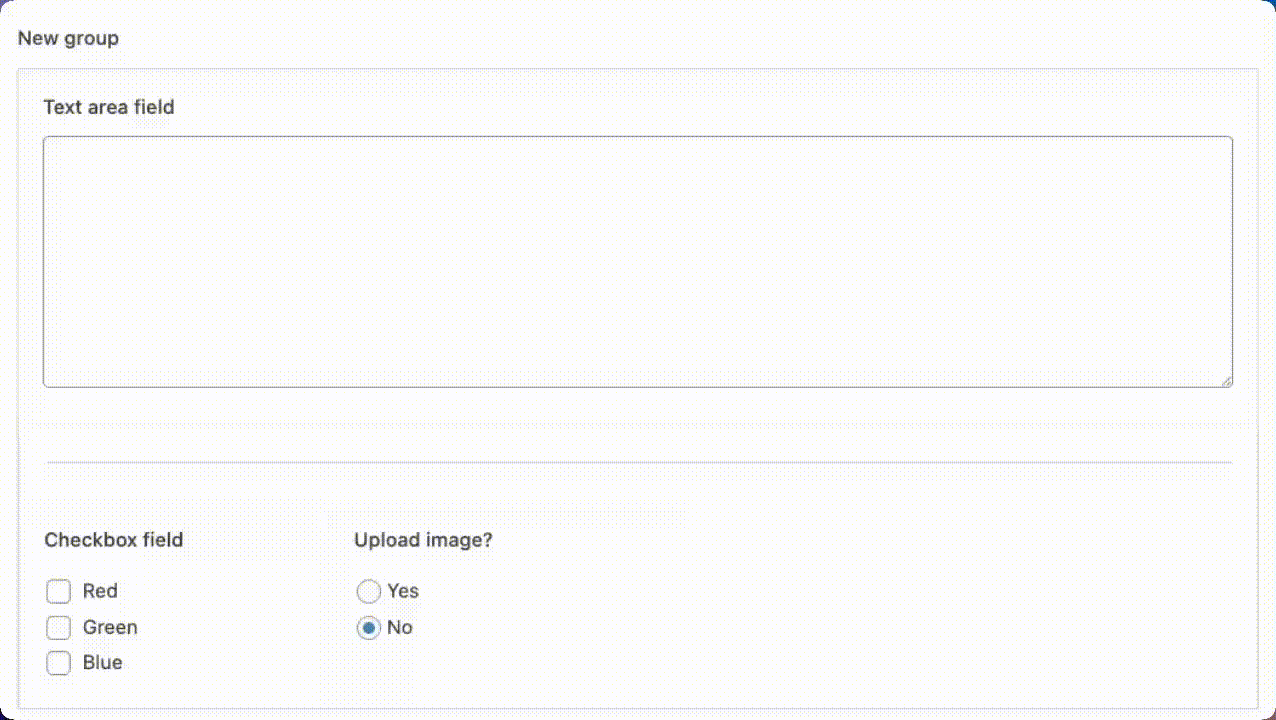
Setting up conditional logic between columns
Create your column layout first, ensuring all fields appear correctly.
Select the field you want to control with conditional logic, go to the “Conditional Logic” tab, and toggle it on.
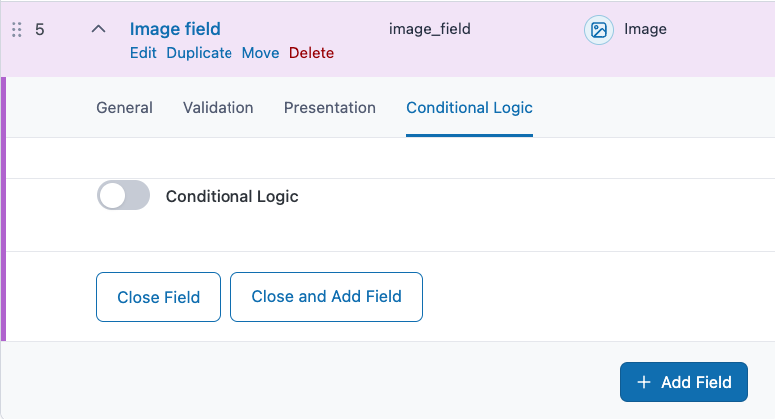
Select the trigger field (can be in another column) and choose the condition and value that will show/hide this field.
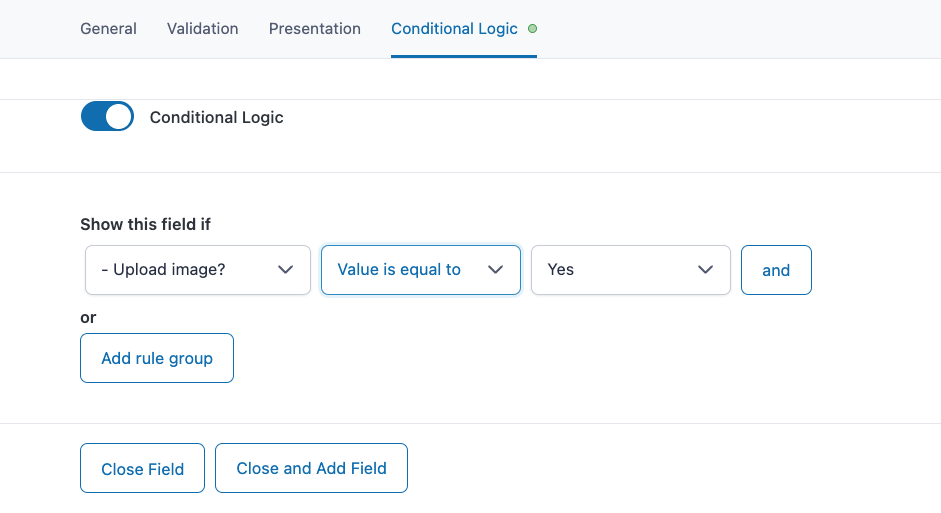
For complex conditions, use “Add rule group” to create OR conditions.
Save your changes and check the results.
Troubleshooting common issues
- If columns aren’t displaying properly, check that width percentages in each row add to 100% or less.
- When fields unexpectedly stack vertically, verify CSS isn’t being overridden by a theme or plugin.
- If conditional logic isn’t working between columns, ensure the trigger field loads before the dependent field.
- For performance issues with complex layouts, try splitting into multiple field groups with targeted display conditions.
Remember to test your column layouts at different screen sizes – ACF automatically stacks all fields vertically on mobile devices to maintain usability.
Take control of your WordPress admin with Admin Columns
Combining Admin Columns with ACF transforms your WordPress admin from cluttered to streamlined. This powerful duo gives you complete control over how your custom field data appears and functions in your content management workflow.
- Smart filtering lets you quickly find content based on any ACF field type – including text, numbers, dates, relationships, and even complex fields like repeaters. Need to update multiple posts at once? The bulk editing feature saves you from tedious post-by-post changes, turning hours of work into minutes.
- Your team members can work more efficiently with custom table views tailored to their specific roles. Set up saved filters for content editors, administrators, or shop managers so everyone sees exactly what they need without distractions.
- When you need to analyze your custom field data or share it with stakeholders, the export functionality lets you quickly generate reports from any view you’ve created.
The beauty of this integration is how it divides responsibilities: Admin Columns handles how your data appears in list tables, while ACF manages how fields display within individual posts and page editors. Together, they create a complete system for managing your custom field data throughout WordPress.
Want to see how this works in practice? Check out our free demo to see how much easier managing ACF data becomes with the help of Admin Columns.
By implementing both tools, you’ll spend less time searching for information and more time using it – making your WordPress admin experience smoother, faster, and much more productive.
Try out Admin Columns today and see for yourself how well it fits with Advanced Custom Fields!